In Magento, XML is arguably the most powerful tool available to developers. Not only is it used to layout the frontend blocks and templates, but it is also sets the framework for the backend admin sections, extension creation, database configuration, and so much more! For a new Magento developer, it can also be one of the most complex features to grasp. Here are some of the best practices and a few useful tips for making your XML work for you:
Condense your code with local.xml
You may have heard before about the magical properties of the local.xml file. Think of this file as a master XML file of sorts. By creating a local.xml file in your theme’s layout folder, you are telling Magento that you have some additional updates that aren’t necessarily tied to a specific module or extension. What this allows you to do is consolidate your site-wide changes into one easy-to-find file. You will also have the added benefit of having fewer XML files in your theme.

eBook
Shopify vs Magento: Our Platform Comparison

A quick breakdown of Magento XML
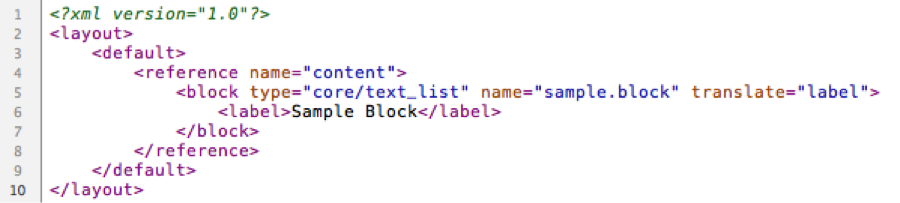
Once you have your local.xml file created in your theme you can start adding your updates. Here is an example of what a default local.xml file should look like:

You can see on the first line that we are specifying the doc type as XML. This is important any time you are creating a new XML file and you will find this same line in every XML file throughout Magento. After that, you will see the <layout> tag. This is telling Magento that we want to target the layout portion of the frontend. All layout updates should be within the <layout> tags.
The direct child nodes of the <layout> tag are referred to as handles. Each of these handles corresponds to a specific section of the Magento layout. If you were to go through any of Magento’s other layout XMLs you would see an array of handles for the different pages of the frontend. You will notice that the handle we are using here is the <default> handle. With a few exceptions, the default handle is loaded alongside every other handle on the frontend. So any updates inside of the <default> handle should show up on every page of your site. Some other handles that are used frequently are:
- Home Page: <cms_index_index>
- CMS Pages: <cms_page>
- Category Pages: <catalog_category_default>
- Product Pages: <catalog_product_view>
- Cart Page: <checkout_cart_index>
Once you have specified which handle you are going to update you can start referencing blocks within the handle. To reference a block simply add a <reference> tag with the name attribute equal to that of the block you want to reference. In this case we are referencing the block with the name “content” and within that reference we are creating a new structure block named “sample.block” and giving it a label. The new block has been created in the same way that the block named “content” was created. If we wanted to, we could add additional XML within that new structure block or reference the new structure block in the same way we targeted the block named “content”.
Now that we have an idea of how the XML works, we can move on to some cool tricks you can do with Magento’s XML.

Avoid duplicate code using custom handles
One pain of having multiple handles in Magento’s layout is that you will occasionally have to use the same XML code in multiple handles. For someone who doesn’t know about custom handles, this means copying and pasting code is several places. This method is not only wasteful, but it can also become hard to manage. A good alternative is to use a custom handle. Say, for instance, we have the following code:

You will notice that we have two handles, one for the default category handle and one for the category with layered navigation. Inside those handles we have the exact same code. If we wanted to change something, we would have to do it in each handle separately. Instead, we will create a custom handle named “catalog_custom”. Inside of that handle we will place all of the XML that we have in the other handles. Next, we are going to use the <update> tag to tell Magento that we want the current handle to use code from another handle, in this case the “catalog_custom” handle we created. We will place this <update> tag in both of the original handles, as seen below:

This now allows us to make a single change and have it take effect in multiple places. We can also place handle specific code alongside our <update> tag, if we still had handle-specific updates.
Before and After Attributes
Several blocks within Magento will simply list out any child blocks that have been associated with it. Many of the default structure blocks are this type of block (the left and right sidebar, content areas, footer). By default the associated blocks will render in the order they were loaded. We can change the order that the blocks are rendered by using the before and after attributes.

Above, you can see the attributes in action. You can see that the first node uses the before attribute. However, since no name has been specified, the first node’s block will show up before any other block. Alternatively, the second node is using the after attribute and targeting the first node. This means that the second node will show up after the “catalog.layered” block. With this functionality, you are able to tweak the positioning of all of your blocks without having to hard code the positioning in a PHTML file.
Remove and Unset Child
There seems to be some confusion for developers between the <remove> tag and the “unsetChild” action method. Both remove the targeted element from the page, but which one should you use and where?
I will start by mentioning that Magento will allow you to give multiple blocks the same name within a single handle. As long as none of the blocks are within the same reference, they will render out correctly on the page. For the sake of example, imagine that we create two blocks, one in the left column and one in the right. We will name both of these blocks “sidebar.block”

If we were to add the code <remove name=“sidebar.block” /> anywhere inside the handle, it would remove any block with the name “sidebar.block” within the entire handle. This would mean that both blocks, left and right, would be removed from the page. However, if we want to remove the left block, that’s where “unsetChild” comes into play. If we were to add
<action method=“unsetChild”><name>sidebar.block</name></action>
inside of the “left” reference, it would remove all instances of “sidebar.block” within the reference. This example shows the difference between the two ways we can remove objects. The main difference is essentially just the scope in which elements are removed.
There are so many facets to Magento’s XML, it’s impossible to give them all their due credit in a single post. However, these tips should hopefully help you optimize the code you already have in place and streamline any future XML changes!