
Did you know that 51% of Americans with internet access prefer to shop online? And that number is continuously growing. With the growing majority of people that shop online, it’s crucial for eCommerce websites to showcase their products in the best way possible.
It only takes a vague amount of consumer behavior knowledge to understand that shoppers critique product images and base their purchase decisions off of these images. As consumers, we’ve all judged products based on the images we’ve seen online before making a purchase decision.
Turn shoppers into customers with great product photography. And remember that when photographing products, customers are looking for quality and value before making a purchase decision.
Create the best images for your eCommerce site and increase conversions by following these 5 product photography basics.
What is Product Photography?
Product photography is taking pictures using specific techniques to accurately and attractively represent your website’s products. Great product photography increases conversions by enticing shoppers to purchase your product.
5 Basic Principles for Product Photography
- Use a clean, consistent background
- Shoot from a tripod for photo consistency
- Choose between natural and artificial light
- Include all product details
- Shoot a variety of images
Use A Clean, Consistent Background
Consistency is key when it comes to product photography. Using the same background for your product images will keep your website looking clean and organized. At Groove Commerce, we love using Ortery equipment when photographing small to medium-sized products. But despite your choice of technology, we recommend using a solid colored background, like white or black.
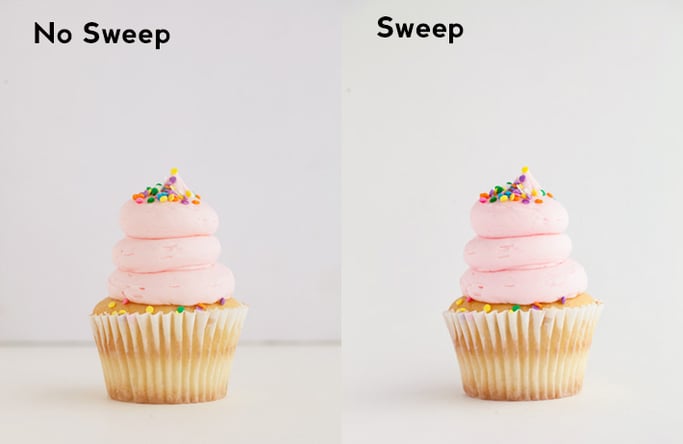
Choosing your background color should depend on the color palette of your products and website. The goal is to make your product come to life by minimizing flaws in the background. Use a sweep to reduce flaws and make your image front and center.
A sweep is a bendable sheet of paper that sits beneath your product and curves up against the wall behind the product. Here’s an example of how taking advantage of sweeps can dramatically improve your product photography:
Shoot From A Tripod For Photo Consistency
Your eCommerce site probably has a variety of products for sale. As we mentioned earlier, consistency is key. Placing each of your products consistently on your website contributes to an aesthetically-pleasing and professional appearance. With the use of a tripod, this is easier than it seems.
Be sure to shoot your products not only against the same background but also at the same distance away from the camera and at the same height. This will guarantee that the products fill the same position and space within the frame of each photograph. Easily accomplish total photo and website consistency by shooting with a tripod. Tripods secure your camera and smartphone (yes, you can use a smartphone for product photography!) which makes it easier to capture products from the same angle and position each time.
Choose Between Natural and Artificial Light
Natural Light
Natural light refers to - you guessed it - sunlight. Take advantage of the light the sun provides when photographing products, especially if they're meant to be used outside.
Let’s say, for example, you’re selling a garden hose and taking photos of a person holding the product. Take advantage of the sunlight by angling the hose in the sun. This will cast a natural shadow on the person’s body and will emphasize the garden hose. You can always contrast the shadow as much as you’d like in Photoshop to make sure the product is the main focus of the photo.
Natural light softens the image of the product, so be sure to avoid adding natural light to an already artificially lit photo. Doing so will soften the product that was intended to look sharpened and can potentially make the small details of the product unclear.
Artificial Light
Use artificial light if you want to to highlight the physical details of your eCommerce products. For example, if you’re selling jewelry with intricate details, we recommend using artificial lighting. Bright light bulbs show all of the product’s details and sharpen them under the light.
Since artificial light sharpens the details of the product, be sure to avoid adding artificial light to an already naturally-lit photo. Doing so will sharpen the product that was intended to look soft.
Include All Product Details
Online shopping unfortunately limits shoppers to only see your product through the images you provide. Shoppers are unable to feel, touch or try on your products like they can in a store. That’s why it’s crucial to clearly showcase all details of the product - no matter how small. Customers that are shopping around on your site want to see everything the product has to offer before making a purchase decision.
Remember, customers are looking for quality and value in your product. Show them your products’ quality and the value you have to offer through basic product photography. Customers are more likely to trust your brand if you show and tell them all of the product’s details.
Shoot A Variety of Images
This may seem like common sense, yet it is so important. Take multiple images of your product! This ties in with showing your customers all of the details. Shoot from many angles and, if possible, show the product being used.
Customers shopping online value not only high quality images but also a variety of images to look through. Be transparent when showing what you have to offer so that customers are satisfied (or dissatisfied) with your product. Hiding flaws in product images can result in customers returning your product and never ordering from your brand again because they don’t trust it.
The goal of eCommerce product photography is to gain consumer trust and, ultimately, increase conversions. The way in which you portray your products directly influences whether or not consumers will purchase from you.
One of our secrets to successful eCommerce product photography is to remember some key factors that go into capturing the specific photographs. We're sharing 3 tips to help you develop a product photography strategy that converts.
eCommerce Product Photography Tips To Get Started
When capturing photographs of your products for your website, be sure to do the following:
- Minimize flaws in the background
- Shoot from a variety of angles
- Show the product in use, and get creative with it
1. Minimize Flaws In The Background
At Groove, we’re big fans of using Ortery equipment for small to medium-sized products that need to be photographed. But no matter what technology you use, we recommend using a clean, solid-colored background.
White is a classic background color for shooting product photography; however, be aware of whether it will contrast with the product and how it will display on your website.
If your product or your website color palette is predominately white, use a darker or textured background or monochromatic fabric to add some contrast and make the product really come to life instead of blend into the background.
Check out the image below to see how a colored sweep really makes the cupcake stand out. Imagine that cupcake in front of a white background - it would clash.

Remember - if you’re shooting the same products in different colors, flavors, etc., make sure there is a consistency in how the images are shot. Be sure that all products are against the same background, at an equal distance away from the camera and filling the same position and space within the frame. A uniform series of images gives an aesthetically pleasing appearance and adds a level of professionalism across your eCommerce site.
2. Shoot From A Variety Of Angles
When customers shop around your site, they try to gather as much information about your products as possible. Since most online shopping limits your visitors to one of the five senses — sight — you have to make sure they can clearly see every aspect of your product.
Utilize a series of angles when it comes to taking pictures of your products — especially when it comes to products in the fashion industry. Think about how you look at shoes when you’re shopping online. You want to see the designs in detail, how the shoes look from all angles and the variety of colors in the shoe.
Offering 360° imagery (an awesome feature of the Ortery Photosimile 200) creates a virtual experience for the user to explore all angles and details of your products. 360° images help answer any questions users may have that couldn't be answered if they were faced with only a single, static shot of your product.
Zappos does a great job of showing a wide variety of high-quality, dynamic shots of their shoes in the color options they offer, and they even allow the customer to zoom in to see the details of the design.

3. Show The Product In Use, And Get Creative With It!
Does your product have any key features that set it apart from your competitors’ products? If your handbags are known for their adjustable straps and that’s something featured in the product description, show it off by taking a few lifestyle shots of your product in use!
A key skill in taking photography of any kind is being able to properly work with and manipulate the space around your subject matter. So, get inside the mind of the user and get creative with it!
J. Crew does a great job of utilizing 3 images to show this bag strap in use. Instead of showing a photograph of the strap alone, they included a few images of what the strap looks like on a person's shoulder. This helps consumers have a better idea of what the they'll look like wearing that product.
In addition, if you’re working with multiple items in your photo, don’t just lay them out in a straight line and expect your customers to swoon. It’s about positioning, choice of colors to include and disregard, and what you want your audience to focus on when they look at the photo.
It can be a bit of a dance and a definite learning curve, but once you learn to embrace the space instead of fear it, you’ll find that it’s much easier to work with. It will even pave the way to getting started with eCommerce product videos.
5 Product Photography Tips To Increase Conversion Rate
In this blog, we're sharing how to showcase your products in a way that makes shoppers feel like they're already holding your product in their hands. Do it right, and those shoppers will be holding your product soon enough.
Follow these 5 eCommerce product photography tips to ensure you're capturing the product's essence and providing an exceptional online shopping experience for customers:
- Hire a professional
- Shoot only the product
- Shoot multiple angles
- Allow users to zoom in on your images
- Show all colors
1. Hire A Professional
Although choosing not to hire a photographer may save money at first, we can guarantee that inadequate product photography for eCommerce sites cause more money to be lost in the long run. No matter what you sell, hire a professional if you're trying to make a business by selling these products online.
Professional photos add credibility to your brand and relay to shoppers that your brand is a serious and legitimate business. Not to mention, beautiful photos that are well-lit and full of detail and texture evoke a positive emotional response from shoppers, which is always a great thing.
2. Shoot Only The Product
When photographing products that you're trying to sell, it's critical that you shoot only the product. Don't dress up the photo with a fancy backdrop or flowers - this isn't the time to get artistic.
Consumers arrive on your site to view and purchase your products, so stay focused on showcasing just the items you intend to sell to see an increase in conversions.
Remember, you're trying to convey key information about the product to your website visitors. Consider the size, shape and color of the products you're shooting. There is one caveat to this, however.
If the item is very small or difficult to determine its size based on a standalone photo, it may be helpful to show the product in perspective so that visitors can get an idea of its true size before purchasing.
In the images below, this Kate Spade handbag is shown on a model to help shoppers envision its size.


3. Shoot Multiple Angles
If you're photographing a product that is small enough to hold in your hands, we recommend shooting it from five major angles: front, back, top, bottom and side.
Of course, not all products need to be captured from all angles. A pack of disinfecting wipes, for example, can get away with photos from just the front and back angles.
On the other hand, larger products may be harder to shoot from multiple angles. First, consider how much the product is worth. If it's highly expensive, we recommend shooting from as many angles as you can. Remember, a variety of images helps to reassure consumers — who are about to spend a significant amount of money— that your product is exactly what they want.
4. Allow Users To Zoom In On Your Images
When it comes to the actual product images within your eCommerce website, it's critical that you offer the option of zooming in on the images. Here a few valuable tips for zooming in on product photos:
- Avoid using a zoom link/hover where the image isn't enlarged
- Ensure the zoom is at least double the original size
- Use a shadowbox or light box for pop-ups
Make sure your visitors know how to zoom in. Some sites use pop-ups, but many browsers have a default pop-up blocker. We recommend a shadowbox or light box for pop-ups that will simply open the larger image while dimming out the rest of the page.
We're not huge fans of the rollover zoom because it usually displays to the right of the image — which also happens to be where the product information, like price and add to cart button, are located. It can create a negative user experience when a user mouses over the image by accident and is zoomed in.
5. Show All Colors
This seems like a no-brainer, but some sites still lack images showing a colored-variety of products. If your item sells in several colors, show visitors every single color you have to offer. Indecisive shoppers already have difficulty choosing between available colors — avoid making their problem worse, and just provide images with all available colors.
Conclusion
Whether you’re just getting started with product photography or you’re already a professional photographer, referring to these product photography basics will aid in the professionalism and success of your photography.
If you’d like to learn more about product photography basics or have any questions, reach out to us through the form below, and we’ll be happy to help!